Did everyone successfully ssh into rhino?
Did everyone get the book?
…that might be useful.
Our goal is to give you enough momentum to learn what you need as you go.
This stuff doesn’t stick unless you keep doing it.
The application of computation towards the analysis and processing of biological data
Rinse and repeat… New insights and conclusions lead to new data and questions, etc.
You will spend more time sitting around and thinking about how to solve problems than you will typing code.
https://en.wikipedia.org/wiki/How_to_Solve_It
When this fails, try to break down into simpler pieces and iterate (solve an easier or related problem first).
The most important, but hardest part.
Unix is a proprietary operating system from the 60s.
True Unix is rare these days, but its philosophy and design live on in “Unix-like” systems (including OsX). When we say “Unix”, we usually mean it in this general sense.
We’ll be using Ubuntu Linux, a Unix-like operating system.
Bioinformatics naturally embraces this.
The shell is a wrapper around the operating system, through which text commands and output are used to interact with the computer.
This is analogous to the desktop environment on your personal computer.
Unix was built for remote access. Computers were big and expensive, so people shared resources.
Today, this remains useful:
Do this however you figured out how to do it for your OS.
ssh <username>@rhinoWrite down which rhino you connect to, so you can directly connect to that next time. (e.g If you get connected to rhino3, next time use ssh <username>@rhino3.)
Let us know if you get an error message along the lines of “can't find home”.
You should be able to connect to the rhinos from outside the hutch by connecting to the Hutch VPN.
You can also ssh into <username>@snail.fhcrc.org, and then from there execute ssh <username>@rhino<N> to get into your rhino.
We’ll cover things more thoroughly next class. For now, just some basic information for orientation.
What follows is your Zombie Apocalypse Unix guide.
command [flags] [operands]
ls -a ~ls: The command, in this case for listing directory contents-a: A flag which specifies that hidden files should be listed~: An operand, in this case a special symbol which points to your home directoryNote: Spaces are important here (but not how many).
-h, --help, or -help flag and return useful information about how to construct a valid command.man <command-name>.aproposExample: ls --help & man ls & apropos calculator
If you are in the terminal and things seem “stuck” (a program is running that won’t stop), try the following:
Ctrl-c, Esc, q, Ctrl-d, Esc : q Enter
Note: These are key commands;
- means press the keys at the same time.Bash can “auto-complete” command and filenames. Just start typing and hit Tab.
Try ls ~/bioi<Tab>.
Bash maintains a history of the last several commands you executed. You can access these by typing history.
If you want to run a command similar to one you just executed, you can use the up/down arrow keys to move through the history, edit the line, and re-execute.
SciComp has set up a module system for customizing your environment.
We’ll be using the intro-bio module, loaded by executing module load intro-bio (note: this only affects the current shell session!).
module load intro-bioYou might get a message that says Using already loaded python, but don’t worry about it. If you see nothing, it’s fine. If you see an error message, please raise your hand.
We don’t want to have to remember to load this module every time, and there are other things we want to have set up for us every time we open a shell session. We can make these cusomtizations by editing our ~/.bashrc configuration file.
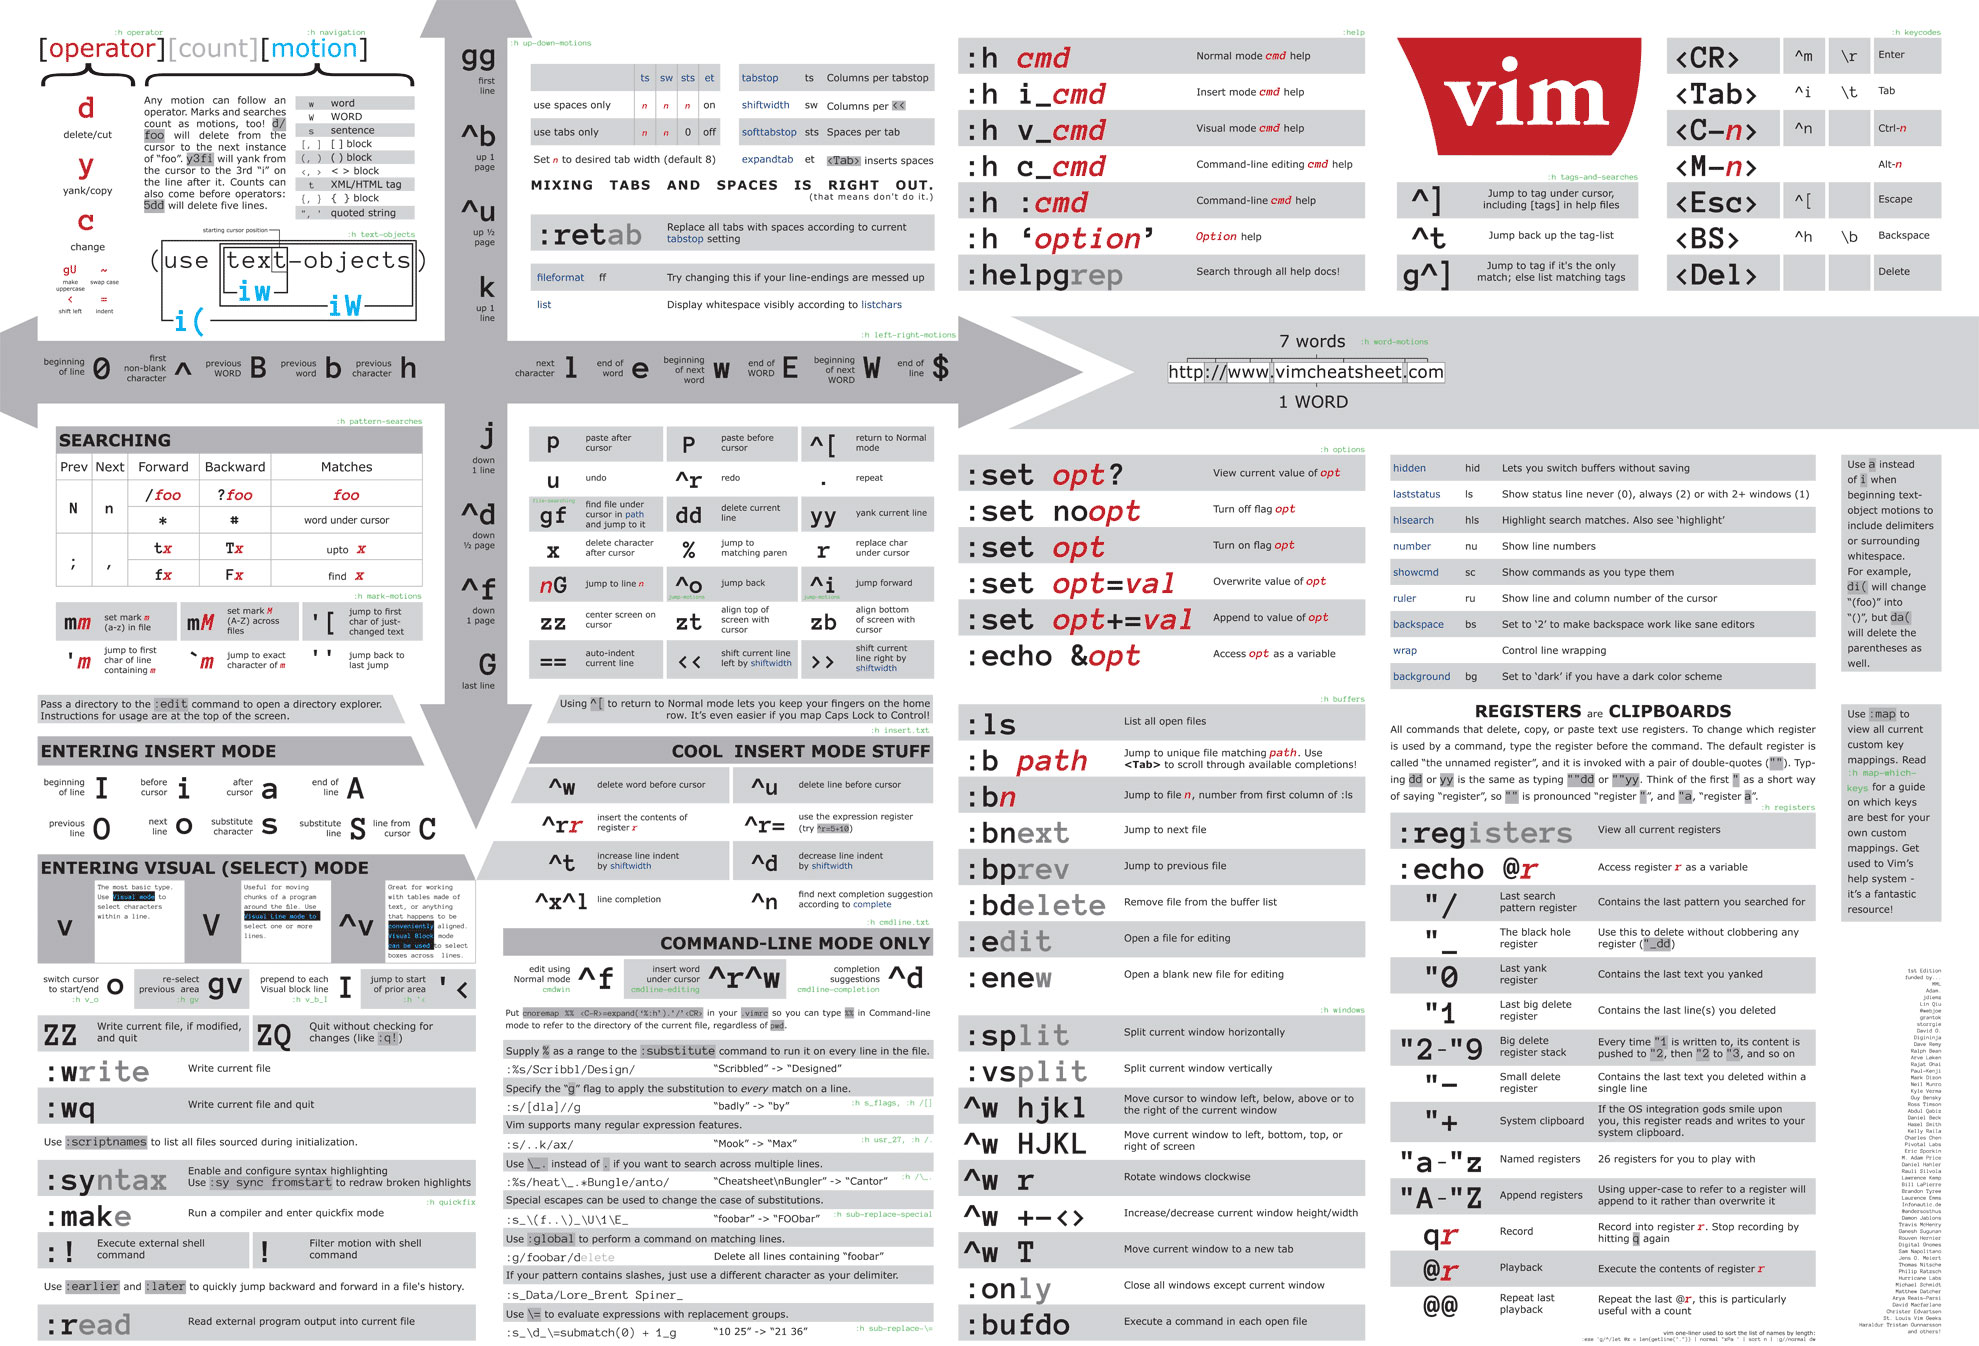
But first, we’re going to learn how to edit a text file from the terminal using vi.
Vi is a wonderful, powerful, but completely arcane editor. However, it’s worth being able to use because:
Vim has two primary modes:
Fully understanding comamnd mode takes time, but basic usage is quite simple.
vimtest.txt with vimvim vimtest.txti to enter insert modeEsc to exit insert mode and enter command mode: w <Enter> to save: q <Enter>Run cat vimtest.txt to see your text. That wasn’t so bad, was it?
(click down for more advanced usage)
So far the only real action has been in insert mode. The other mode in vi is the command mode. In this mode you can quickly navigate and modify your file using key commands.
There are lots of ways to move your cursor around in command mode:
hjkl keys)0 moves to the beginning of the line, and $ moves to the endb moves back one word, and w moves forward one{ moves back one paragraph, and } moves forward one( moves back one sentence, and ) moves forward oneYou can prefix these commands with numbers to move faster, e.g. 3 w moves you forward three words.
There is a simple way to cut and paste exactly analogous to a word processor: highlight a block of text, then copy or cut, then paste.
v; this places you in visual moded to cut, y (for yank) to copyp to pasteMotions and actions can be combined. E.g.:
d w cuts one word, and d 2 w cuts two wordsy w copies one word, and y 2 w copies two wordsYou can also cut/copy entire lines with the shortcuts d d and y y.
If you ever mess anything up (which is easy to do in command mode), u is undo and Ctrl-r is redo (from command mode).
vimtutor command, available wherever you find vimNote that you can totally use the arrow keys while you You certainly can, though it’s not considered hip (because vim is all about efficiency, and moving your hands from home position to the arrow keys is not efficient.)
We can customize our environment using a “dotfile” that gets loaded when new shell sessions are created: ~/.bashrc.
vim ~/.bashrc to open the filei for insert modemodule load intro-bio
export PATH=~/bin/:$PATHSave and quit (Esc then :wq<Enter>), then run source ~/.bashrc to reload the changes.
Tmux let’s combine multiple Unix shells into one.
We could open multiple terminal windows to multitask, but each would need its own ssh connection. Also, without tmux, if our connection dies, so do our programs. With tmux we can:
We’ll use tmux throughout this class to keep sessions running. But first let’s download a nice tmux configuration file for making things easier.
# This is a command that downloads a tmux configuration file
wget https://raw.githubusercontent.com/fredhutchio/intro-bioinformatics/gh-pages/config/tmux.conf

ls

# tmux knows to look for our config file at ~/.tmux.conf
mv tmux.conf ~/.tmux.conf

# Note that this file is hidden once we make it a "dotfile"
ls ~
ls -a ~tmuxYou should now see a fresh shell session inside of tmux.
Ctrl-a - your “Command key”Ctrl-a c - New windowCtrl-a <Space> - Next windowCtrl-a | - Split window into panes verticallyCtrl-a - - Split window into panes horizontallyCtrl-a <arrow> - Move betweenCtrl-d - Close a pane or windowFor more tmux tips, click down.
You can also use h, j, k, and l in place of the arrow keys, as in vim.
You can also swap/reorder panes using Ctrl-a J and Ctrl-a K.
Ctrl-a < - move vertical split leftCtrl-a > - move vertical split rightCtrl-a + - move horizontal split upCtrl-a + - move horizontal split downNote: You can click Ctrl-a once, and hold the second key for big moves.
Ctrl-a , will let you name a windowCtrl-a ' presents a list of windows (by name)<arrow> and Enter to switch to a windowCtrl-a <numeric> switches to a window by number.When a noisy program floods a tmux pane, your mouse wheel won’t let you scroll, like in a normal shell session. Pressing Ctrl-a [ will place you in scroll mode. Use can now use arrow keys or Ctrl-u/Ctrl-d to scroll through the history, and search with /.
From this mode, you can also press Space to enter copy-mode, <arrow> keys to specify a collection, and Enter to copy the selection. To paste the selection, use Ctrl-].
You can also interact with tmux using commands, and you can see a list of commands and explanations on the man page:
man tmuxAll of the key combos above are just bindings to these commands, so this is a good place to go if you’re trying to figure something out.
tmux attach to attach to an existing session.Remember: tmux attach will fail if you don’t have a session open already; if that happens just enter tmux to start a new session.
This class builds around analysis of a real world dataset of Simian Foamy Virus (SFV). SFV is a retrovirus that infects non-human primates, but can infect humans bitten by NHP. Howver, we appear to be a “dead-end” host.
This data set looks at viruses sampled from humans and monkeys in Bangladesh.
Here’s how I typically organize things:
your-project
├── README.md
├── build.sh
├── data
│   ├── sequences.fasta
│   └── metadata.csv
├── scripts
│   ├── clean.py
│   └── plot.R
└── output
    ├── alignment.fasta
    ├── cleaned_metadata.csv
    ├── tree.newick
    └── tree_plot.png
Note: this is a little different than the organization from the book; Use what works for you, but be consistent.
mkdir ~/bioinfclass

cd ~/bioinfclass
mkdir data output scripts

ls
(You’ll always enter in the things you see in these black boxes)
wgetwget https://goo.gl/8Nk5tZ -O data.tar
lsNote that we now have a data.tar file in this directory. This is an archive type (like zip) common on Unix systems. To unpack it
tar -v -x -f data.tarStart vim with vim README.md
i to enter insert modeEsc to exit insert mode and enter command mode: w <Enter> to save: q <Enter>tree prints out a directory tree as ASCII art.
treeNote: This may not turn out right on Windows PuTTY terminals.
cat prints the output of file(s) to the screen.
cat data/sfv.fastalessless lets us “page” through data, without flooding the screen.
less data/sfv.fastaPress the q key to exit from less.
less data/sfv.csvPress the / key to enter a search string
(Try human or monkey; Use n and N to toggle through results).
The source code for these slides is available on GitHub.
https://github.com/fredhutchio/intro-bioinformatics
For the code that generated these slides, look at the .mds files in the src directory. (This code is an extension of Markdown, which we’ll look at more next week)
To submit issues or questions about the class, go to the Issues page.
Please, please, please!
tmux and vim and memorize the basics of how to use themRecommended reading:
Reading for next class: